After you have talked about how adjust the offset of the sound from the video, here's how repair videos broken / corrupted.
When you download a movie, it happens that the download goes wrong for X reasons due to the vagaries of computer :-):
- Your movie has been downloaded 100%, no error detected during the download, but the file is still corrupt
- Your movie has not been fully downloaded, it was discontinued
- The video was already broken when it was proposed to you
A broken video means that missing information, it is not complete. The missing information, cannot be released a hat at the same time as the rabbit, are permanently lost!
A video player is struggling to interpret these missing information, these are holes for him, a film contains such data from the beginning to the end, if there is a hole, it is that there is a problem! Even a video which shows that the black or white contains data such as the length, quality, ect… If there is a hole in the Middle, all the information is inaccurate as the time… and the video player will not read the film.
Repair cut the video there or there are errors, resulting from an inevitable shortening of the video. Sometimes errors are minimal, and you won't see any difference compared to the full movie, sometimes, it can miss you a few seconds to a few minutes…
- Windows Media Player simply does not read movies when it detects an error.
- VLC you indicates that the film is broken and offers to repair before launch, but done temporarily.
- Media Player Classic automatically repairs you movie, slightly faster than VLC, but also temporary repair.
Here is the method to repair the film definitely:
(In addition, this method is sometimes better than the repair of VLC, it allows to retrieve a max of data)
1. We will be using a downloadable free program here.
This program is called DivFix ++, and requires no installation on your computer! (This is the so-called portable program)
2. Just unpack it to a location on your computer, and then double click on DivFix ++ .exe
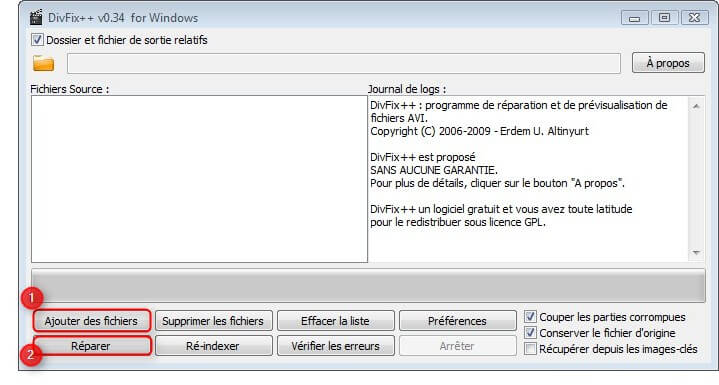
Available French language translation: to do this, click on Preferences and choose French, then click on the small white cross on a red background, the program will not in french a second after.
3. Click on add a file (1), add your movie, and then click Repair (2). And in the folder, you'll have the beginning repaired film by the name DivFix ++ followed by the name of your movie!
4. Ensure that the repair has taken place, and if it satisfies you, you can delete the original. (You can ask what the program removes direct the original after repair, to do this, it is necessary to uncheck the keep the original file)
In short, it's simple as pie and the next time that you start your movie, it will not need to be repaired!

